import tensorflow as tf import matplotlib.pyplot as plt %matplotlib inline from lxml import etree from matplotlib.patches import Rectangle import numpy as np import glob
查看Tensorflow版本 查看是否支持GPU加速 1 tf.test.is_gpu_available()
创建输入管道 读取所有图片 1 images = glob.glob('./images/*.jpg')
读取xmls标注文件 1 xmls = glob.glob('./annotations/xmls/*.xml')
对读取的图片jpg与xmls进行名称提取 1 2 xmls_names = [x.split('\\')[-1].split('.xml')[0] for x in xmls] images_names = [x.split('\\')[-1].split('.jpg')[0] for x in images]
对读取的图片jpg与xmls名称进行求交集,找到存在图片和图片对应的标注数据 1 2 names = list(set(images_names)&set(xmls_names))#数据&,求交集 set函数求交集(&)、差集(-)、并集(|) imgs = [img for img in images if img.split('\\')[-1].split('.jpg')[0] in names]
set函数求交集(&)、差集(-)、并集(|)
s1 = set(‘here’)
s2 = set(‘hello’)
print(s1-s2)#差集
print(s1&s2)#交集
print(s1|s2)#并集
对图片和标注数据的路径进行排序 1 2 imgs.sort(key=lambda x: x.split('\\')[-1].split('.jpg')[0]) xmls.sort(key=lambda x: x.split('\\')[-1].split('.xml')[0])
创建读取xmls里面对应的标注数据函数 1 2 3 4 5 6 7 8 9 10 def to_labels(path): xml = open(r'{}'.format(path)).read() sel = etree.HTML(xml) width = int(sel.xpath('//size/width/text()')[0]) height = int(sel.xpath('//size/height/text()')[0]) xmin = int(sel.xpath('//bndbox/xmin/text()')[0]) ymin = int(sel.xpath('//bndbox/ymin/text()')[0]) xmax = int(sel.xpath('//bndbox/xmax/text()')[0]) ymax = int(sel.xpath('//bndbox/ymax/text()')[0]) return [xmin/width, ymin/height, xmax/width, ymax/height]#返回比例值
调用读取xmls里面对应的标注数据函数,计算每张图片对应的比例值 1 labels = [to_labels(path) for path in xmls]
对列表中的比例值进行解压缩(拆分),获取全部图片的[xmin/width], [ymin/height],[ xmax/width], [ymax/height] 1 out1_label, out2_label, out3_label, out4_label = list(zip(*labels))
1 2 3 len(out1_label), len(out2_label), len(out3_label), len(out4_label) (3686, 3686, 3686, 3686)
对图片路径和标注数据进行先后乱序 1 2 3 4 5 6 index = np.random.permutation(len(imgs))#对路径先后顺序乱序,permutation(图片数量)返回相同长度的列表乱序,也可以乱序矩阵 images = np.array(imgs)[index] out1_label = np.array(out1_label)[index] out2_label = np.array(out2_label)[index] out3_label = np.array(out3_label)[index] out4_label = np.array(out4_label)[index]
设置图片resize大小 创建图片读取函数 1 2 3 4 def read_jpg(path): img = tf.io.read_file(path) img = tf.image.decode_jpeg(img, channels=3) return img
1 2 3 4 def normalize(input_image): input_image = tf.image.resize(input_image, [scal, scal])#scal = 224 input_image = tf.cast(input_image, tf.float32)/127.5 - 1#[-1,1] return input_image
1 2 3 4 5 @tf.function def load_image(input_image_path): input_image = read_jpg(input_image_path) input_image = normalize(input_image) return input_image
标注数据Dataset 1 2 3 4 5 label_datset = tf.data.Dataset.from_tensor_slices(( out1_label, out2_label, out3_label, out4_label))
图片路径数据Dataset 1 image_dataset = tf.data.Dataset.from_tensor_slices(images)
图片数据Dataset 1 image_dataset = image_dataset.map(load_image, num_parallel_calls=tf.data.experimental.AUTOTUNE)
图片数据与标注数据zip 1 dataset = tf.data.Dataset.zip((image_dataset, label_datset))
分配train与test数据比例 1 2 3 4 test_count = int(len(images)*0.2) train_count = len(images) - test_count dataset_train = dataset.skip(test_count) dataset_test = dataset.take(test_count)
1 2 3 4 BATCH_SIZE = 8 BUFFER_SIZE = 300 STEPS_PER_EPOCH = train_count // BATCH_SIZE VALIDATION_STEPS = test_count // BATCH_SIZE
1
2
3
train_dataset = dataset_train.shuffle(BUFFER_SIZE).batch(BATCH_SIZE).repeat() train_dataset = train_dataset.prefetch(buffer_size=tf.data.experimental.AUTOTUNE) test_dataset = dataset_test.batch(BATCH_SIZE)
创建定位模型 添加Xceotion预训练网络 1 2 3 xception = tf.keras.applications.Xception(weights='imagenet', include_top=False, input_shape=(scal, scal, 3))
将Xceotion网络设置为不可训练 1 xception.trianable = False
添加模型 1 2 3 4 5 6 7 8 9 10 11 12 13 14 15 16 17 inputs = tf.keras.layers.Input(shape=(scal, scal, 3)) x = xception(inputs) x = tf.keras.layers.GlobalAveragePooling2D()(x) x = tf.keras.layers.Dense(2048, activation='relu')(x) x = tf.keras.layers.Dense(256, activation='relu')(x) out1 = tf.keras.layers.Dense(1)(x) out2 = tf.keras.layers.Dense(1)(x) out3 = tf.keras.layers.Dense(1)(x) out4 = tf.keras.layers.Dense(1)(x) predictions = [out1, out2, out3, out4] model = tf.keras.models.Model(inputs=inputs, outputs=predictions)
模型配置 1 2 3 model.compile(optimizer=tf.keras.optimizers.Adam(learning_rate=0.0001), loss='mse', metrics=['mae'])
设置EPOCHS 模型训练 1 2 3 4 5 history = model.fit(train_dataset, epochs=EPOCHS, steps_per_epoch=STEPS_PER_EPOCH, validation_steps=VALIDATION_STEPS, validation_data=test_dataset)
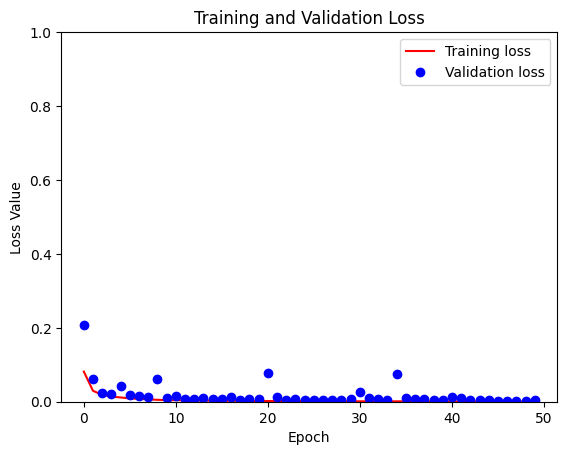
绘制训练train、test的loss变化 1 2 3 4 5 6 7 8 9 10 11 12 13 14 loss = history.history['loss'] val_loss = history.history['val_loss'] epochs = range(EPOCHS) plt.figure() plt.plot(epochs, loss, 'r', label='Training loss') plt.plot(epochs, val_loss, 'bo', label='Validation loss') plt.title('Training and Validation Loss') plt.xlabel('Epoch') plt.ylabel('Loss Value') plt.ylim([0, 1])#取值范围,规定到0到1之间 plt.legend() plt.show()
模型保存 1 model.save('detect_v1.h5')
模型加载 1 new_model = tf.keras.models.load_model('detect_v1.h5')
加载的模型进行预测 1 2 3 4 5 6 7 8 9 10 plt.figure(figsize=(8, 24))#创建画布 for img, _ in test_dataset.take(1): out1, out2, out3, out4 = new_model.predict(img) for i in range(6): plt.subplot(6, 1, i+1)#绘制子图,6行1列的第i+1(subplot从1开始) plt.imshow(tf.keras.preprocessing.image.array_to_img(img[i]))#tensor array 转普通 array xmin, ymin, xmax, ymax = out1[i]*224, out2[i]*224, out3[i]*224, out4[i]*224, rect = Rectangle((xmin, ymin), (xmax-xmin), (ymax-ymin), fill=False, color='red') ax = plt.gca()#获取当前图像 ax.axes.add_patch(rect)#添加矩形框