需要准备的工具
1:windows iso镜像
2:vmware虚拟机
3:anyburn(光盘刻录和镜像文件管理工具) UltraISO也可以能编辑ISO就行了
4:optimizer(系统优化软件)
5:DISM++(系统优化软件)
下载Windows镜像
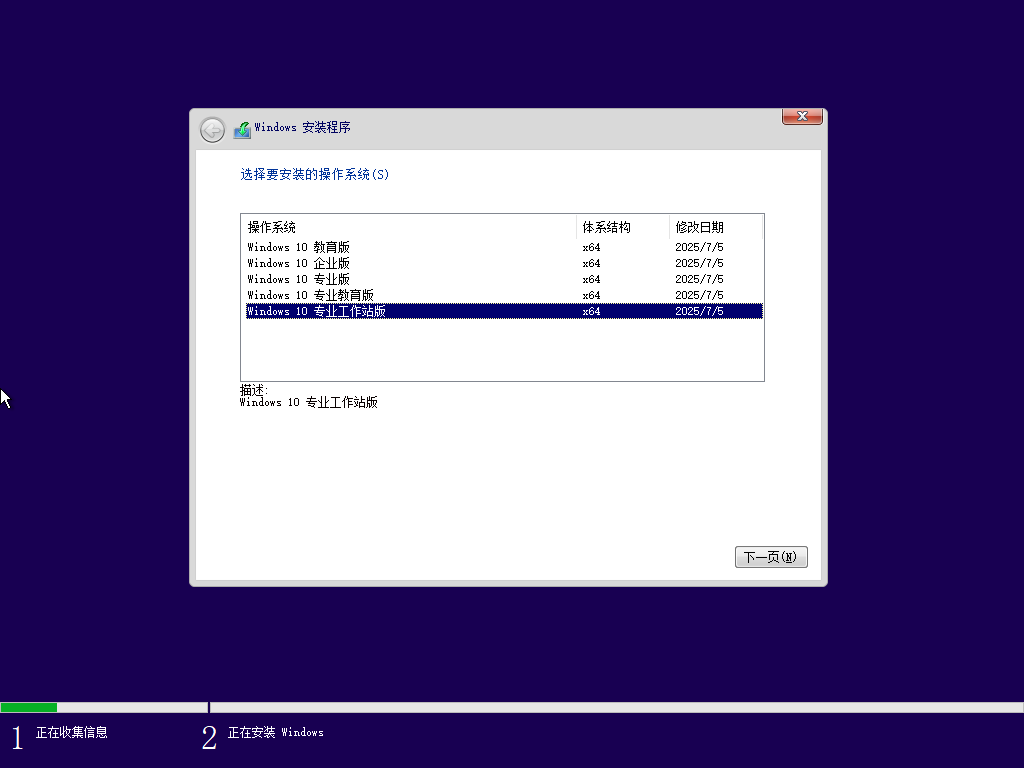
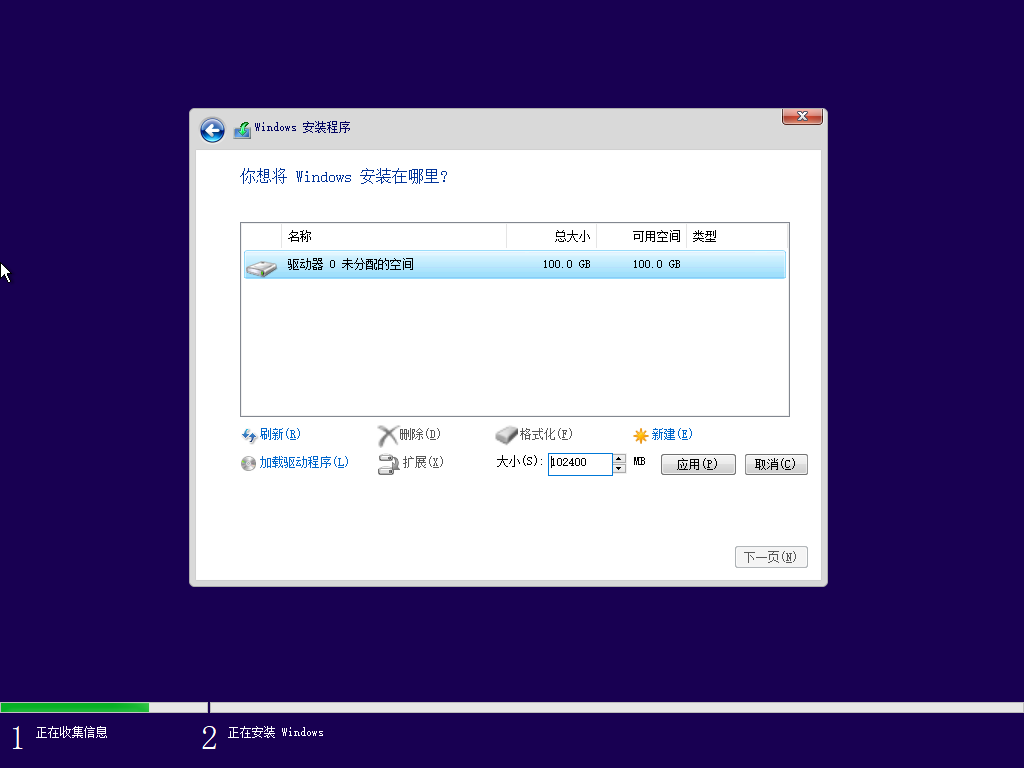
安装镜像到虚拟机
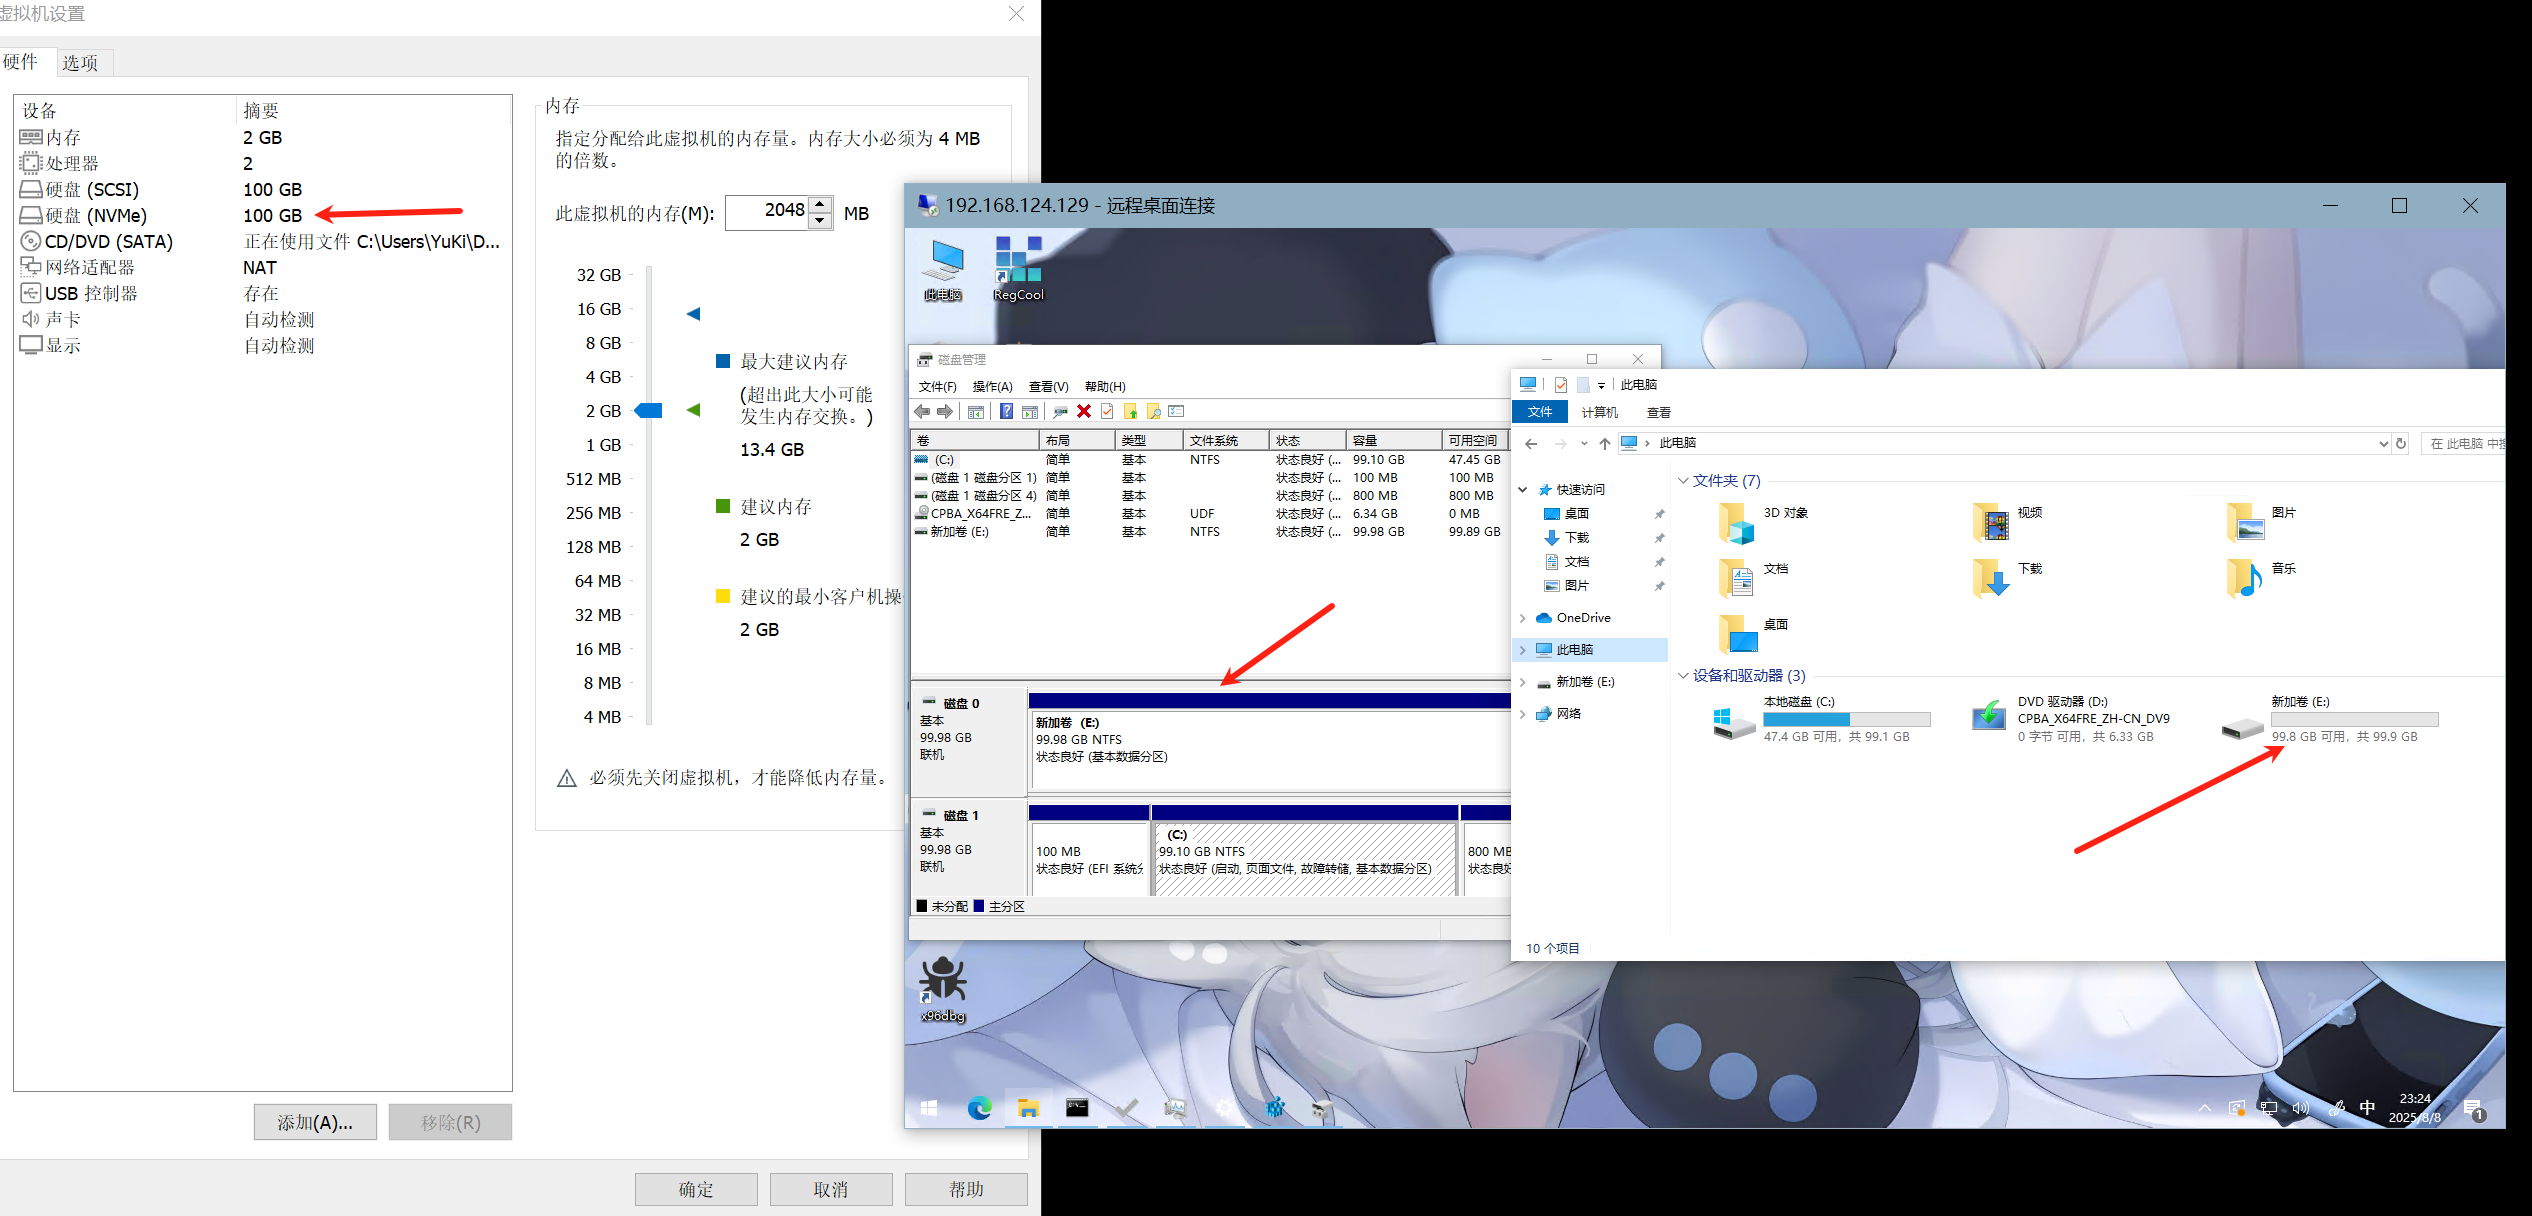
按照自己电脑性能调整内存至少给2G最好8G,磁盘至少给60G
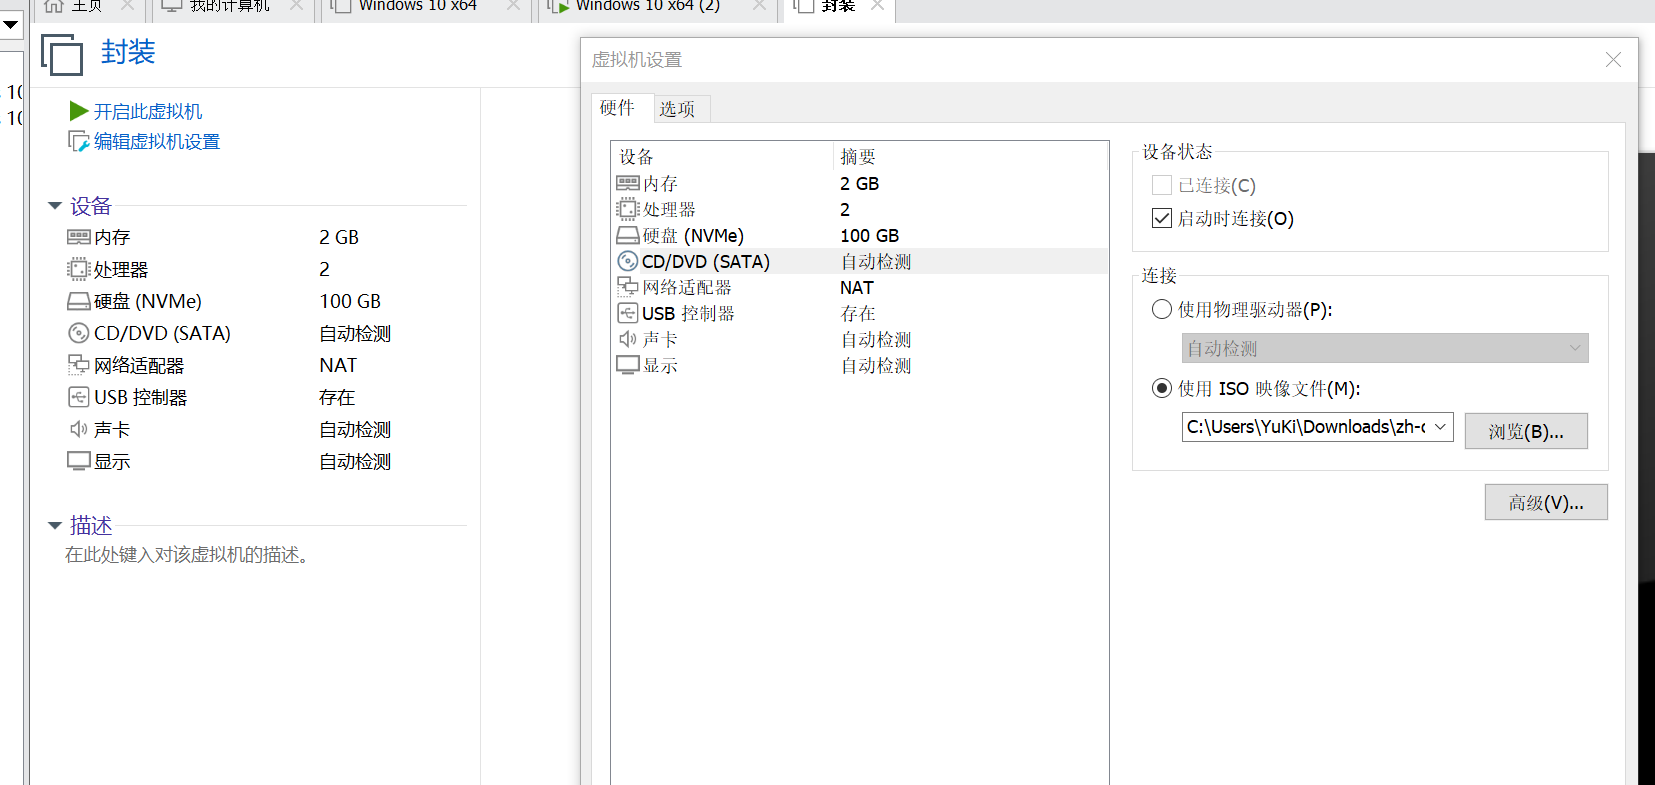
选择对应映像
分配空间大小,下面就和虚拟机安装windows一样啦。
安装所需初始应用和系统优化
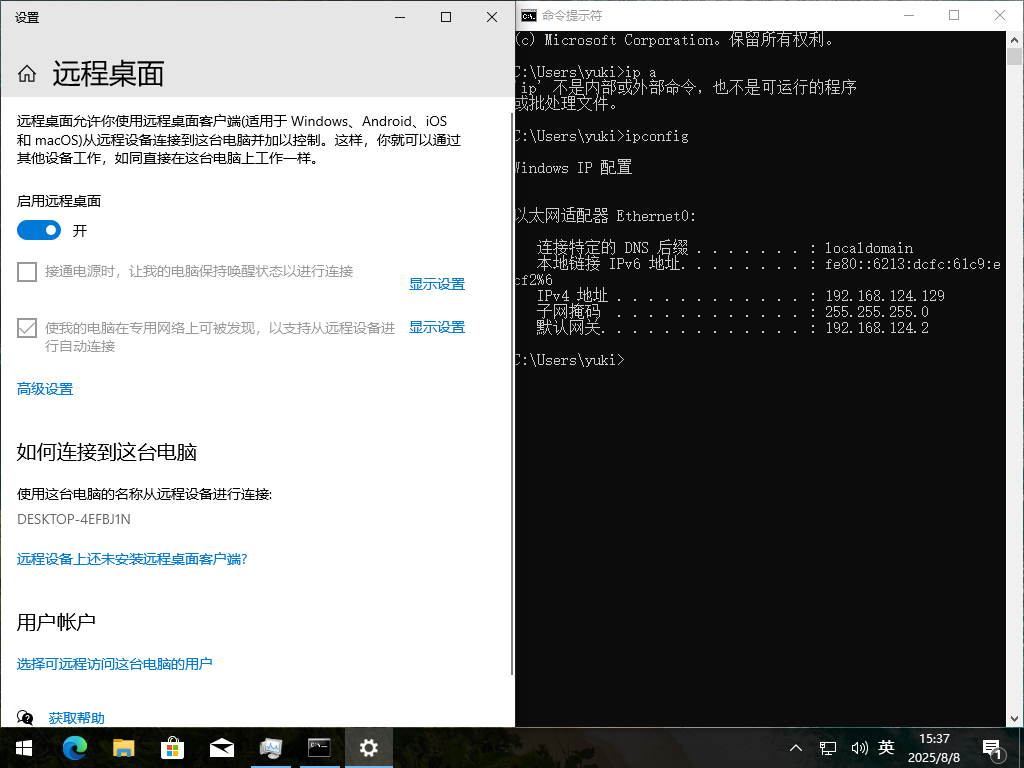
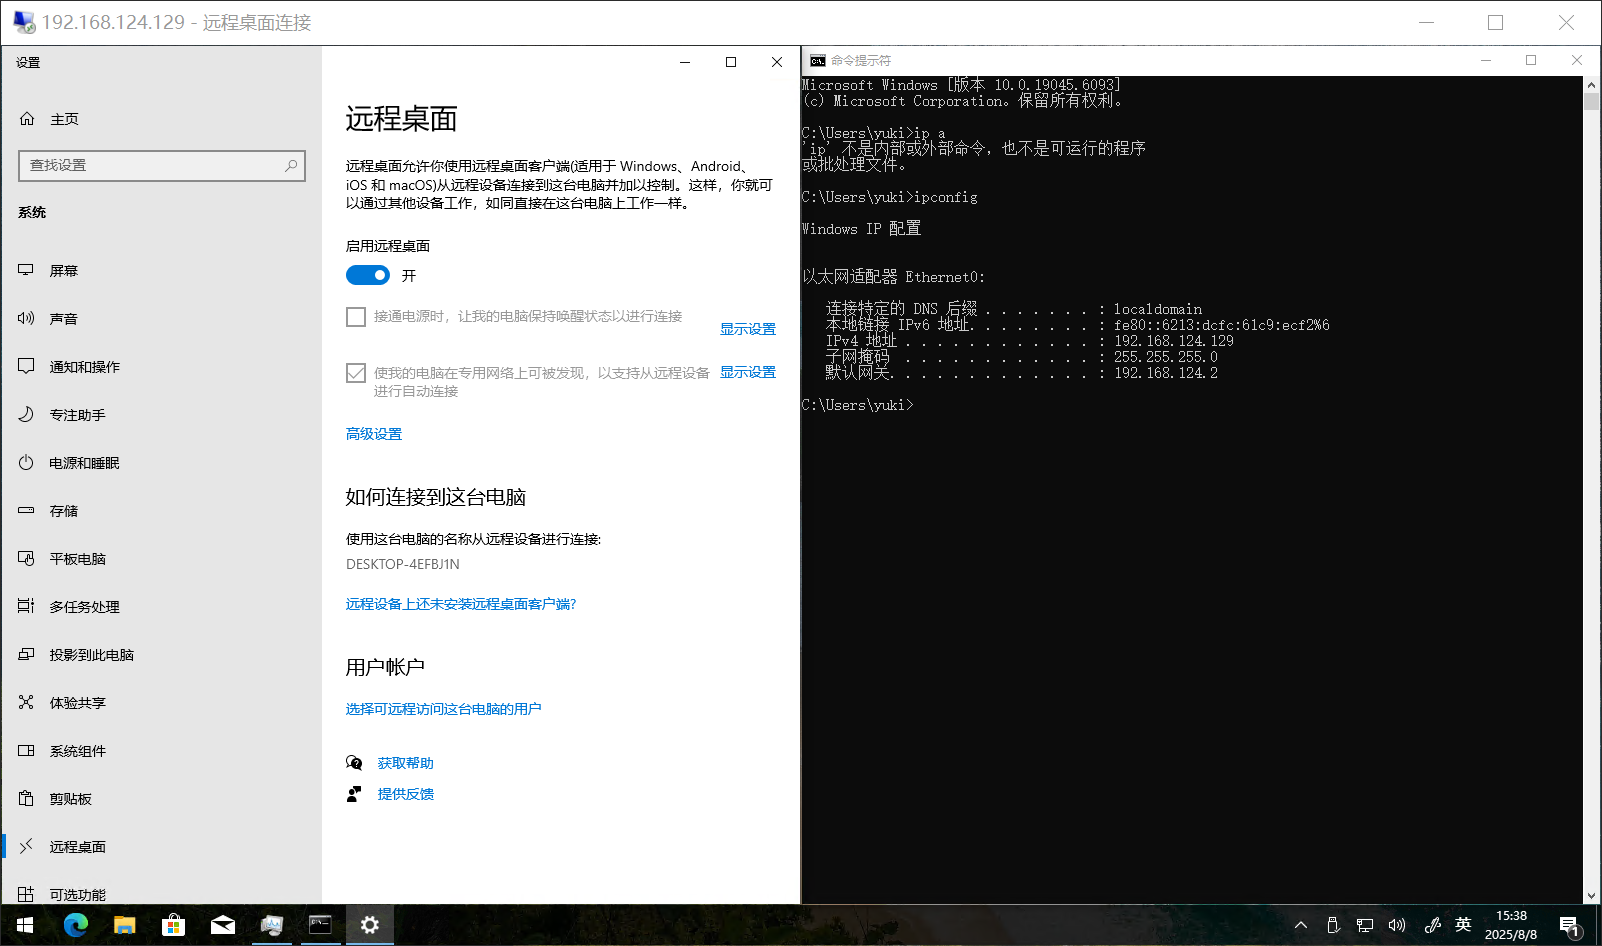
因为是在虚拟机安装,最后提取虚拟机安装到实体机上所以最好不要为了方便安装VMtools(当然你安装后最后卸载掉也行 ~ v ~ ),我的方法是打开远程远程桌面通过微软自带远程控制来拖入程序(反正最后我也要打开的~)
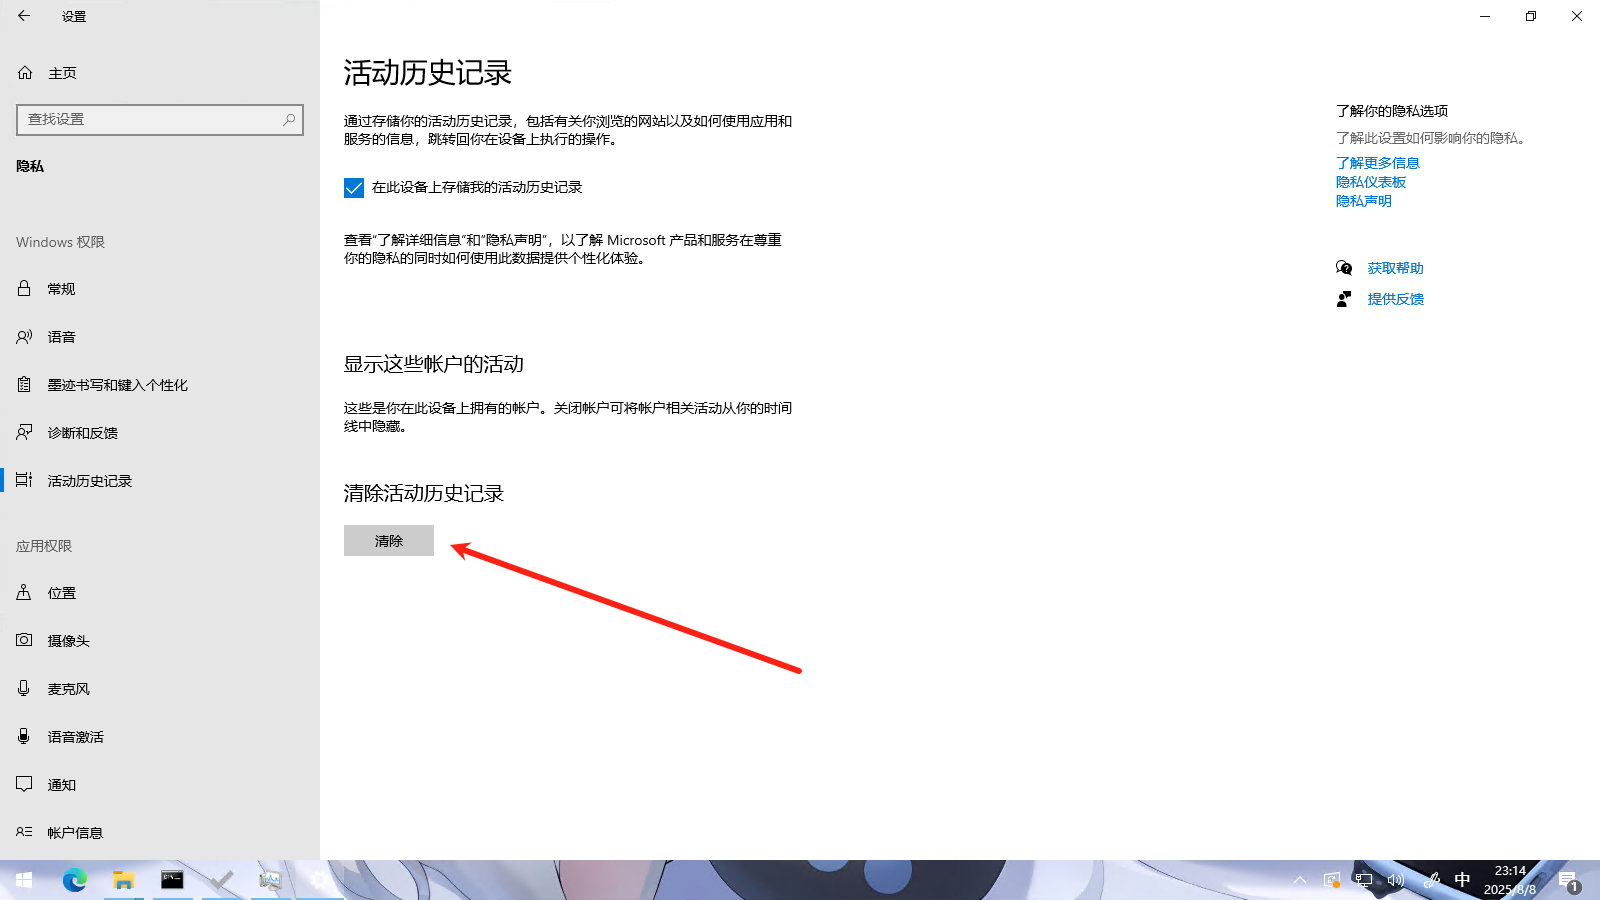
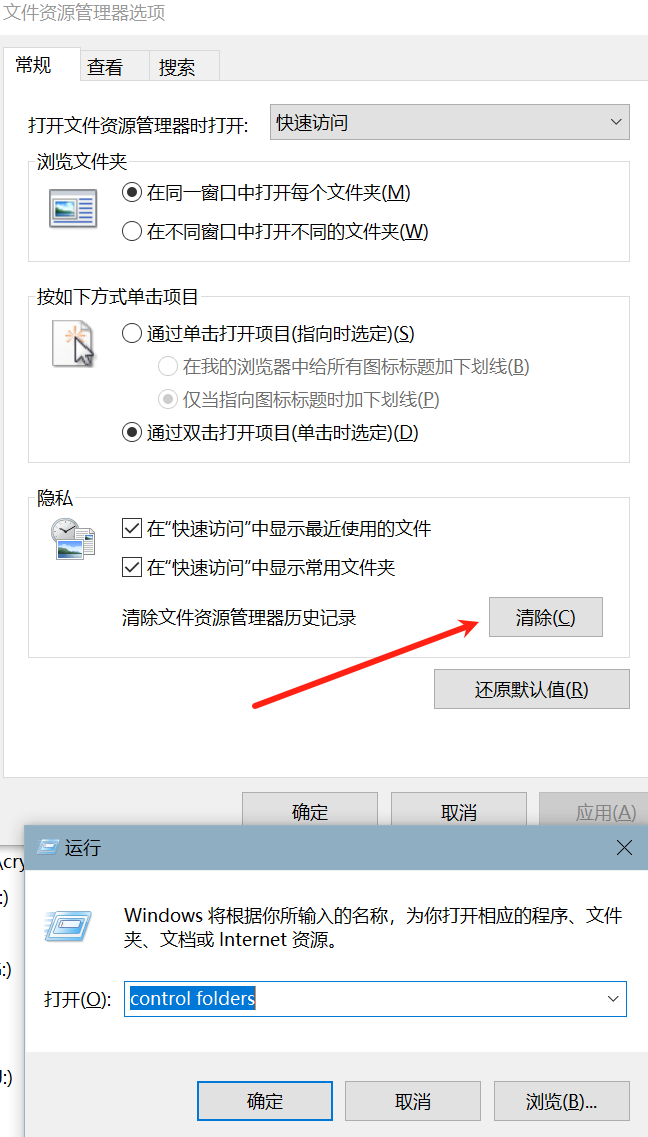
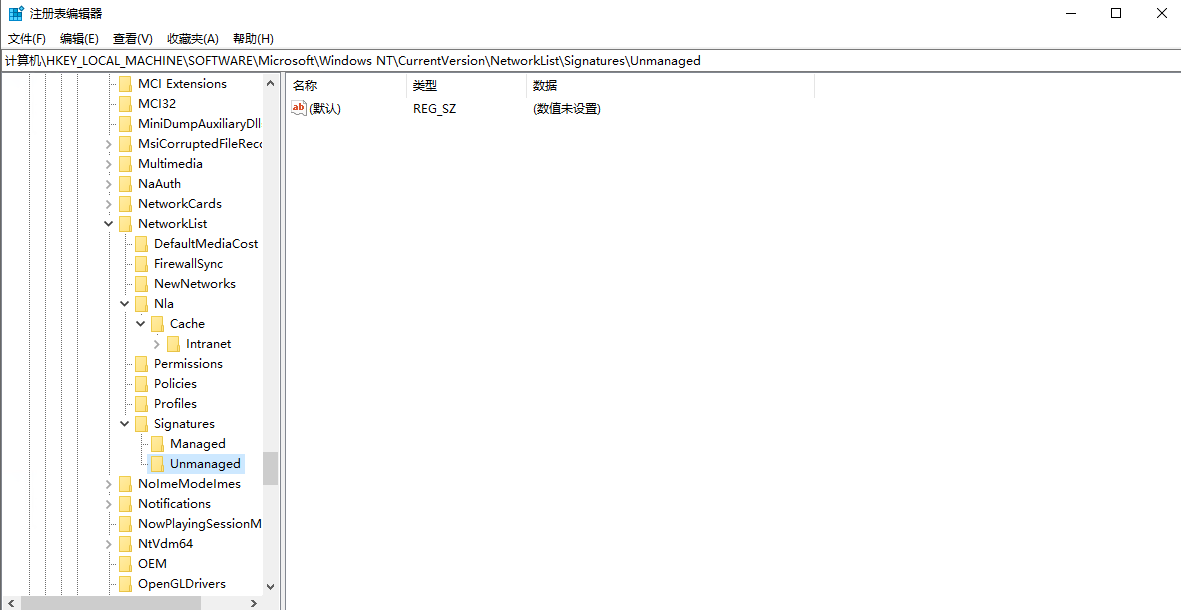
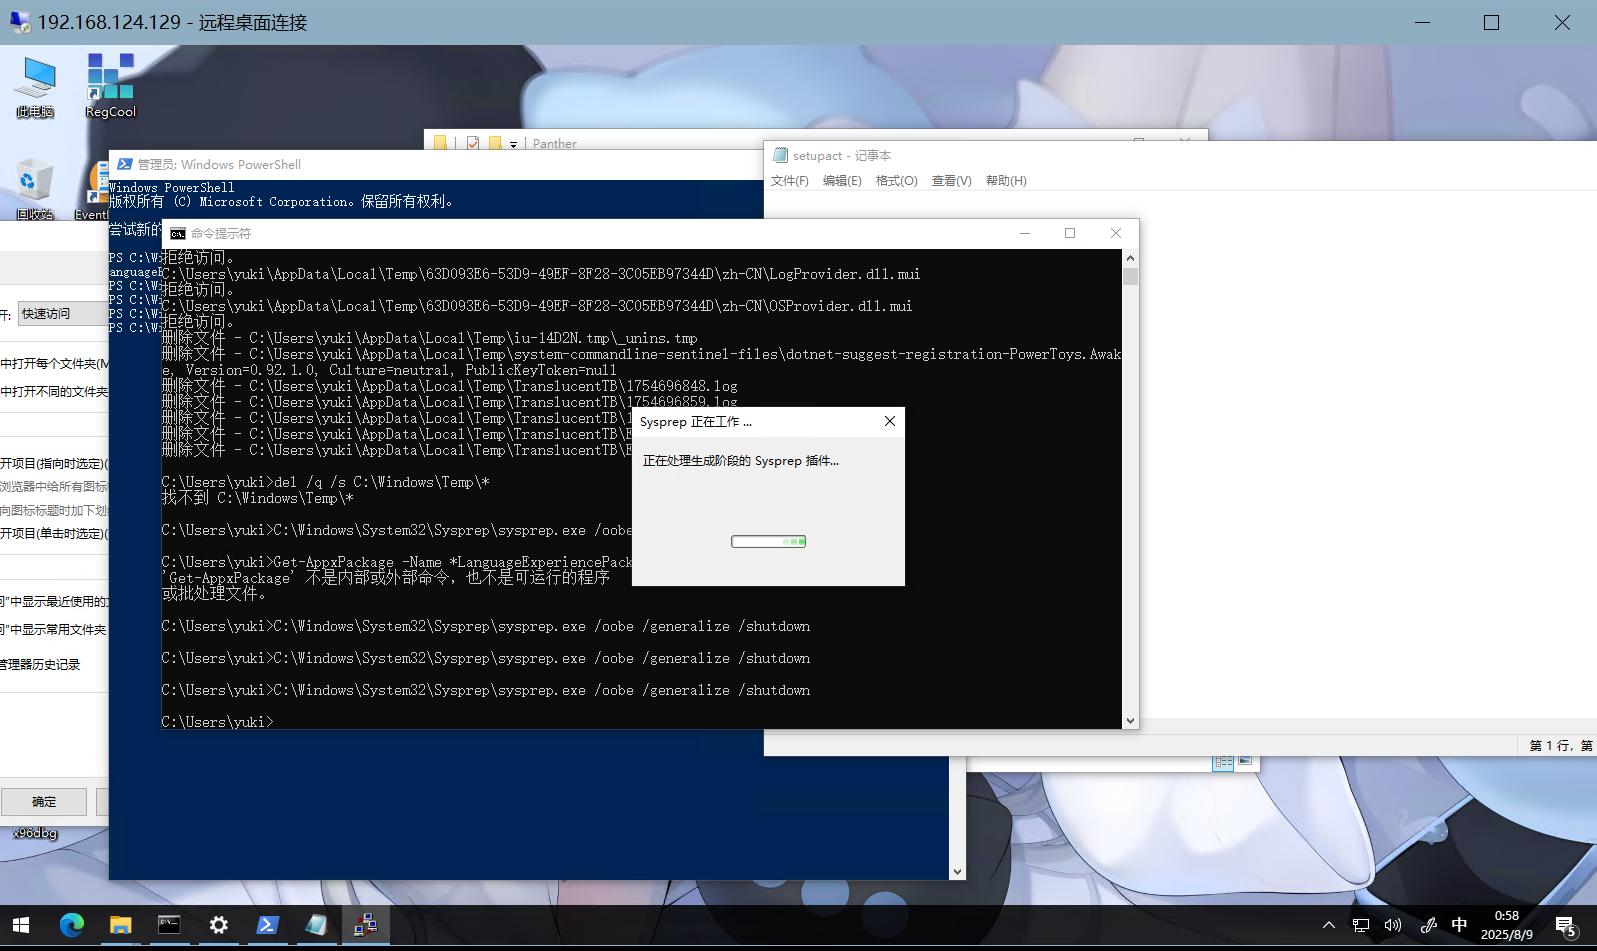
可以在regedit中该路径下删除对应的有线连接记录HKEY_LOCAL_MACHINE\SOFTWARE\Microsoft\Windows NT\CurrentVersion\NetworkList\Signatures\Unmanaged
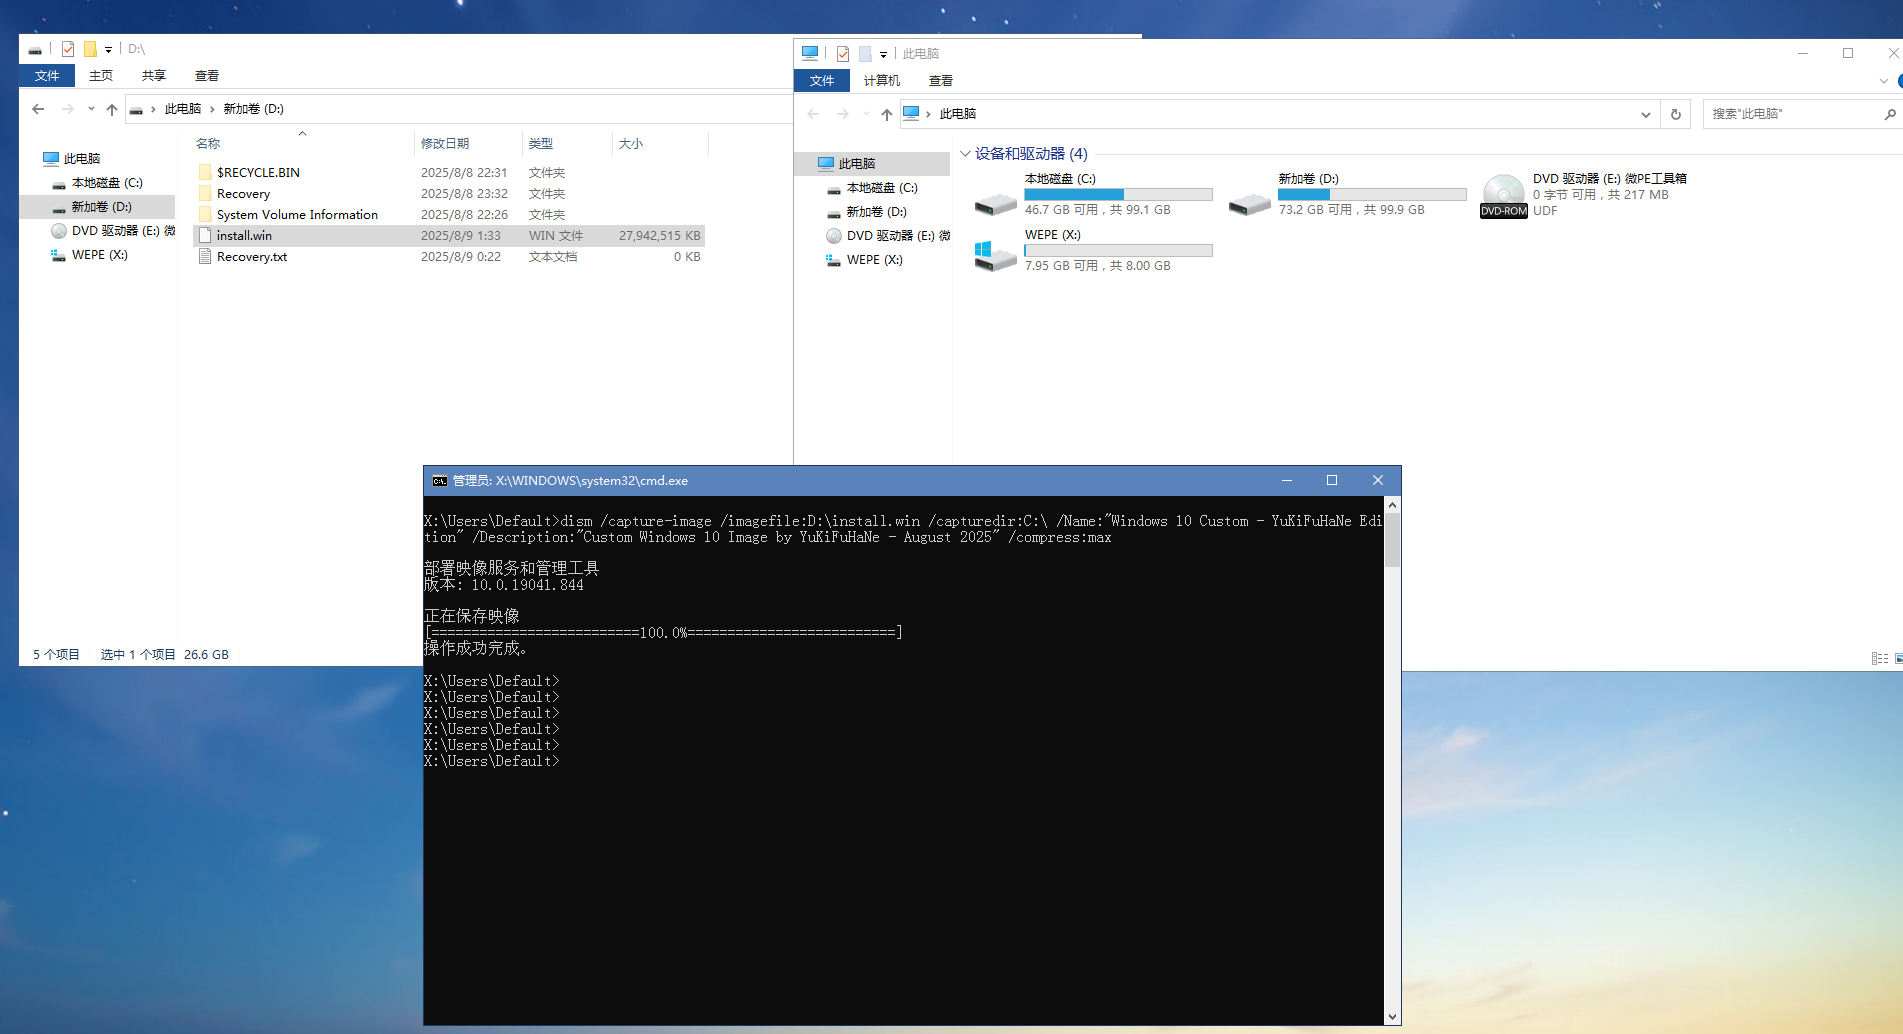
创建install.wim文件
按F2进入bios,调整启动顺序,从CDROM启动

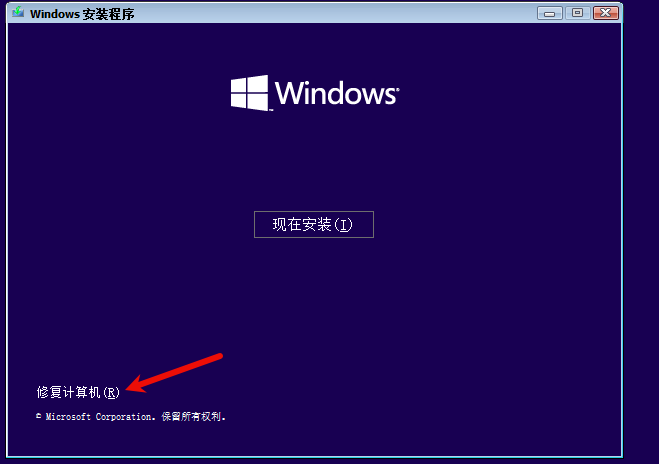
疑难解答->命令提示符
1
2
3
4
5
6
7
8
9
10
11
12
13
14
15
16
17
18
19
20
21
22
| # 清理系统
cleanmgr /sagerun:1
del /q /s %temp%\*
del /q /s C:\Windows\Temp\*
# 卸载不需要的软件
# 配置系统设置
# 安装必要的驱动和软件
# 系统封装准备 (C:\Windows\System32\Sysprep\sysprep.exe /oobe /generalize /shutdown)
sysprep /oobe /generalize /shutdown
dism /capture-image /imagefile:D:\install.wim /capturedir:C:\ /Name:"Windows 10 Custom - YuKiFuHaNe Edition" /Description:"Custom Windows 10 Image by YuKiFuHaNe - August 2025" /compress:max
# 验证镜像完整性
dism /get-imageinfo /imagefile:D:\install.wim
# 检查镜像内容
dism /get-wiminfo /wimfile:D:\install.wim
# 查看镜像大小
dir D:\install.wim
|
/capture-image
- 作用:告诉 DISM 执行镜像捕获操作
- 功能:将指定目录的内容打包成 WIM 格式的镜像文件
/imagefile:D:\install.wim
- 作用:指定输出镜像文件的路径和名称
- 说明
D:\ 是目标驱动器(确保有足够空间)install.wim 是标准 Windows 安装镜像文件名- 这个文件最终会替换原 ISO 中的同名文件
/capturedir:C:\
- 作用:指定要捕获的源目录
- 说明
C:\ 是整个系统分区- 包含 Windows 系统文件、程序文件、用户数据等
- 这是制作完整安装镜像的必要操作
/Name:"Windows 10 Custom"
- 作用:为镜像指定显示名称
- 说明
- 这个名称会显示在 Windows 安装界面的版本选择列表中
- 用户安装时可以看到这个自定义名称
- 建议使用有意义的名称,如 “Windows 10 企业版 自定义”
/Description:"自定义Windows 10镜像"
- 作用:为镜像添加描述信息
- 说明
- 提供镜像的详细说明
- 便于管理员识别和管理多个镜像版本
- 可以包含版本信息、制作日期、包含的软件等
/compress:max
- 作用:启用最大压缩
- 说明
- 显著减小最终 WIM 文件的大小
- 压缩比可达 50-70%
- 虽然捕获时间会稍长,但节省存储空间
应答文件 (C:\Windows\System32\Sysprep\unattend.xml)
1
2
3
4
5
6
7
8
9
10
11
12
13
14
15
16
17
18
19
20
21
22
23
24
25
26
27
28
29
30
31
32
33
34
35
36
37
38
39
40
41
42
43
44
45
46
47
48
49
50
51
52
53
54
55
56
57
58
59
60
61
62
63
64
65
66
67
68
69
70
71
72
73
74
75
76
77
78
79
80
81
82
83
84
85
86
87
88
89
90
91
92
93
94
95
96
97
98
99
100
101
102
103
104
105
106
107
108
109
110
111
112
113
114
115
116
117
118
119
120
121
122
123
124
125
126
127
128
129
130
131
132
133
134
135
136
137
138
139
140
141
142
143
144
145
146
147
148
149
150
151
152
153
154
155
| <?xml version="1.0" encoding="utf-8"?>
<unattend xmlns="urn:schemas-microsoft-com:unattend">
<settings pass="generalize">
<component name="Microsoft-Windows-PnpSysprep"
processorArchitecture="amd64"
publicKeyToken="31bf3856ad364e35"
language="neutral"
versionScope="nonSxS"
xmlns:wcm="http://schemas.microsoft.com/WMIConfig/2002/State"
xmlns:xsi="http://www.w3.org/2001/XMLSchema-instance">
<PersistAllDeviceInstalls>true</PersistAllDeviceInstalls>
</component>
</settings>
<settings pass="specialize">
<component name="Microsoft-Windows-Shell-Setup"
processorArchitecture="amd64"
publicKeyToken="31bf3856ad364e35"
language="neutral"
versionScope="nonSxS"
xmlns:wcm="http://schemas.microsoft.com/WMIConfig/2002/State"
xmlns:xsi="http://www.w3.org/2001/XMLSchema-instance">
<ComputerName>*</ComputerName>
<RegisteredOrganization>您的组织名称</RegisteredOrganization>
<RegisteredOwner>您的姓名</RegisteredOwner>
<TimeZone>China Standard Time</TimeZone>
<ProductKey>XXXXX-XXXXX-XXXXX-XXXXX-XXXXX</ProductKey>
</component>
<component name="Microsoft-Windows-UnattendedJoin"
processorArchitecture="amd64"
publicKeyToken="31bf3856ad364e35"
language="neutral"
versionScope="nonSxS"
xmlns:wcm="http://schemas.microsoft.com/WMIConfig/2002/State"
xmlns:xsi="http://www.w3.org/2001/XMLSchema-instance">
<Identification>
<JoinWorkgroup>WORKGROUP</JoinWorkgroup>
</Identification>
</component>
</settings>
<settings pass="oobeSystem">
<component name="Microsoft-Windows-International-Core"
processorArchitecture="amd64"
publicKeyToken="31bf3856ad364e35"
language="neutral"
versionScope="nonSxS"
xmlns:wcm="http://schemas.microsoft.com/WMIConfig/2002/State"
xmlns:xsi="http://www.w3.org/2001/XMLSchema-instance">
<InputLocale>zh-CN</InputLocale>
<SystemLocale>zh-CN</SystemLocale>
<UILanguage>zh-CN</UILanguage>
<UserLocale>zh-CN</UserLocale>
</component>
<component name="Microsoft-Windows-Shell-Setup"
processorArchitecture="amd64"
publicKeyToken="31bf3856ad364e35"
language="neutral"
versionScope="nonSxS"
xmlns:wcm="http://schemas.microsoft.com/WMIConfig/2002/State"
xmlns:xsi="http://www.w3.org/2001/XMLSchema-instance">
<OOBE>
<HideEULAPage>true</HideEULAPage>
<HideOEMRegistrationScreen>true</HideOEMRegistrationScreen>
<HideOnlineAccountScreens>true</HideOnlineAccountScreens>
<HideWirelessSetupInOOBE>true</HideWirelessSetupInOOBE>
<NetworkLocation>Work</NetworkLocation>
<ProtectYourPC>1</ProtectYourPC>
<SkipUserOOBE>true</SkipUserOOBE>
<SkipMachineOOBE>true</SkipMachineOOBE>
</OOBE>
<UserAccounts>
<LocalAccounts>
<LocalAccount wcm:action="add">
<Password>
<Value>加密密码</Value>
<PlainText>false</PlainText>
</Password>
<Description>本地管理员账户</Description>
<DisplayName>管理员</DisplayName>
<Group>Administrators</Group>
<Name>Admin</Name>
</LocalAccount>
</LocalAccounts>
</UserAccounts>
<AutoLogon>
<Password>
<Value>加密密码</Value>
<PlainText>false</PlainText>
</Password>
<Enabled>true</Enabled>
<Username>Admin</Username>
<LogonCount>1</LogonCount>
</AutoLogon>
<FirstLogonCommands>
<SynchronousCommand wcm:action="add">
<CommandLine>msiexec /i "C:\path\to\your_software.msi" /quiet</CommandLine>
<Description>安装附加软件</Description>
<Order>1</Order>
</SynchronousCommand>
<SynchronousCommand wcm:action="add">
<CommandLine>cmd.exe /c "C:\scripts\post_install.cmd"</CommandLine>
<Description>执行部署后脚本</Description>
<Order>2</Order>
</SynchronousCommand>
</FirstLogonCommands>
</component>
</settings>
<cpi:offlineImage cpi:source="wim:c:/your_image_path/install.wim#Windows 10 Pro"
xmlns:cpi="urn:schemas-microsoft-com:cpi" />
</unattend>
|
使用说明
1
| sysprep /generalize /oobe /shutdown /unattend:unattend.xml
|
修改内容:
- 将
YOUR-PRODUCT-KEY-HERE 替换为您的 Windows 产品密钥
- 将
YourPasswordHere 替换为您想要的密码(使用 PlainText 为 false 时需使用加密密码)
- 修改组织名称、所有者信息等个性化设置
- 根据需要调整时区(示例中使用的是中国标准时间)
密码加密:
要加密密码,可以使用以下命令:
1
| C:\Windows\System32\Sysprep>cmd.exe /k %windir%\system32\sysprep\sysprep.exe /?
|
在显示的信息中找到加密密码的方法。
保存文件:
将文件保存为 unattend.xml 并放置在 C:\Windows\System32\Sysprep 目录下。
执行 Sysprep:
使用以下命令执行封装:
1
| sysprep /generalize /oobe /shutdown /unattend:unattend.xml
|
注意事项:
- 此文件适用于 Windows 10/11 系统
- 根据您的系统架构(x86 或 amd64)调整
processorArchitecture 属性
- 首次登录后执行的命令可根据需要修改或删除